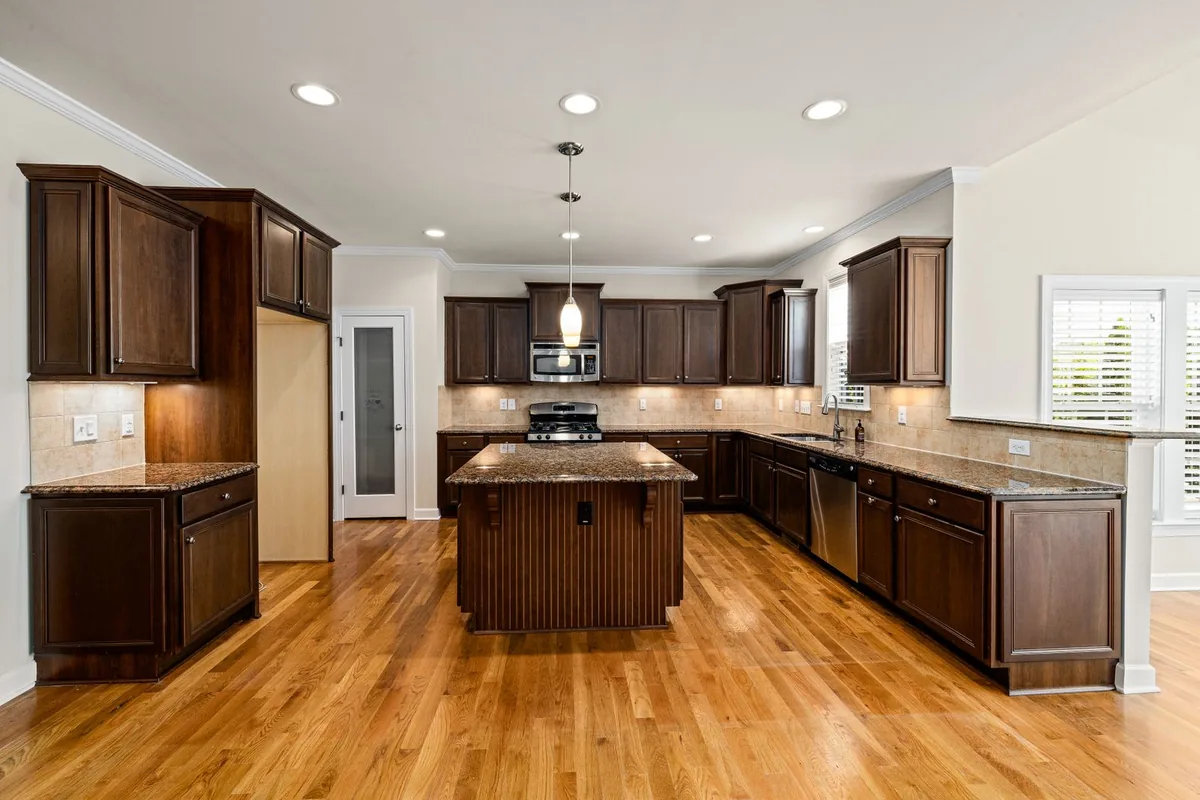
What a kitchen of cabinets costs in Newport Beach, CA
A standard 25-linear-foot Newport Beach kitchen costs $12,500 to $37,500 in genuinely custom cabinetry, $3,750 to $22,500 in semi-custom and $1,875 to $10,000 in stock. Those totals come from multiplying published per-linear-foot bands by the run length, which is the only honest way to turn a rate into a budget.
| Tier | Installed per linear foot | 25 LF kitchen | Source |
|---|---|---|---|
| Stock | $75 to $400+ | $1,875 to $10,000+ | Thumbtack, national, updated 8 July 2026 |
| Semi-custom | $150 to $900+ | $3,750 to $22,500+ | Thumbtack, national |
| Custom, national | $500 to $1,400+ | $12,500 to $35,000+ | Thumbtack, national |
| Custom, California | $500 to $1,200 | $12,500 to $30,000 | Ronbow |
| Custom, Los Angeles | $500 to $1,500+ | $12,500 to $37,500 | Bradco 2026 guide, which publishes the 25 LF total directly |
A 10 foot by 12 foot kitchen is approximately 25 linear feet, per the Bradco guide. Every figure is per linear foot of installed cabinetry, not per cabinet. No published source states a Newport Beach premium over the Los Angeles band, so none is claimed here.
The Bradco guide is the only one of the four that also publishes tier lifespans alongside the prices, and the pairing is worth reading together rather than separately: budget cabinets at $75 to $150 per linear foot in particleboard, MDF or laminate with a stated 5 to 10 year life; semi-custom at $150 to $650 in plywood or veneer at 15 to 25 years; premium at $300 to $800 in solid hardwood at 20 to 30 plus; and luxury custom at $500 to $1,500 plus at 30 to 50 plus years.
How to count your own linear feet before anybody quotes
Measure the wall length that carries cabinets at counter height, add the island separately, and ignore the room dimensions entirely. That sentence resolves most of the confusion in cabinet pricing, because the room and the cabinet run are two different numbers and a 12 by 14 kitchen can be anywhere from 16 to 31 linear feet.
- Measure each wall that carries cabinets, end to end, in feet. Add them up.
- Count a tall pantry or oven tower by its actual width, usually 2 to 3 feet, not as a single unit.
- Count an island by its longest side once, not by its perimeter, unless cabinetry runs on both sides.
- Do not count a wall that holds only a window, a door or a fridge recess with no cabinetry over it.
- Do not count the room's floor dimensions. A U-shaped kitchen in a small room can carry more cabinetry than a galley in a large one.
- Write your own figure down before you receive a quote, then compare it with theirs. A gap of more than two feet is worth a conversation.
The reason this matters is arithmetic rather than suspicion. At $800 per linear foot, a four-foot disagreement about the measurement is a $3,200 disagreement about the price, and it is far easier to resolve on the survey than on the invoice. The unit itself is unpacked further in cabinet cost per linear foot.
What a kitchen cabinet is supposed to carry
A wall cabinet up to 36 inches wide has to take 600 pounds without failing, and a loaded shelf may not deflect more than a sixteenth of an inch per lineal foot. Those are the two numbers from the published standard that a kitchen actually tests in daily use, and they are the two most worth knowing.
| Test | Applied | Pass condition | What it means in your kitchen |
|---|---|---|---|
| 5.1 Shelf and bottom loading | 15 lb/ft² spread evenly, held for seven days | No joint separation; deflection no more than 0.0625 in. per lineal foot between supports, 0.25 in. absolute maximum | A 36-inch shelf of tinned goods is near the top of this band. Longer spans need thicker material or a centre support. |
| 5.2 Wall cabinet loading | 600 lb up to 36 in. wide, applied over four minutes; 800 lb at 36 to 60 in.; 20 lb per inch above 60 in. | No visible failure in the cabinet or in the mounting system | The mounting system is explicitly part of the test. Drywall anchors are not a mounting system. |
| 5.3 Base front joint loading | 250 lb to the rail, or 200 lb | Front joints must not open after the cabinet is in service | This is what happens when somebody leans on an open drawer front or a child hangs off it. |
| 5.4 Impact on shelves and drawer bottoms | A 3 lb steel ball dropped repeatedly | No failure | A dropped jar. The test is deliberately ordinary. |
| 5.5 Impact on base cabinet front and door | A 10 lb sandbag at a 12-inch drop | No failure | A knee into a base door while carrying something. |
Source: KCMA A161.1-2022, section 5, Kitchen Cabinet Manufacturers Association. Quoted as a published yardstick; no certification claim is made for any shop on this site.
The deflection limit is the one that turns an abstract into a shopping decision. Three-quarter plywood comfortably clears it at 36 inches. Half-inch material does not, and thin melamine shelving is already sagging at 30 inches under a serious load. If a quote does not state shelf thickness and span, those two numbers are worth asking for by name.

The sink base, and why it is specified on its own line
Specify a plywood sink base on every Newport Beach kitchen, and treat it as a separate line item from the rest of the run. There is no kitchen in which this is the wrong advice, and the reason is the failure mode rather than the material.
A slow leak under a sink does not stay under the sink. Water tracks along the cabinet bottom, into the bottom rail, and across to whatever the sink base is joined to. In a particleboard carcass the bottom swells, loses its grip on the fasteners, and the whole run starts to move. By the time it is visible from the outside, two or three cabinets are usually involved. In a plywood carcass the same leak produces a stain and a repair.
The published evidence for the material difference is narrower than people assume, which is exactly why the one table that does separate the materials is worth citing precisely. Fannie Mae Estimated Useful Life Tables, Form 4099.F, August 2019, lists "Kitchen: Cabinets (wood construction)" at 20 yearsand "Kitchen: Cabinets (particle board)" at 15 years, with a separate line for a bathroom vanity at 10. Those tables describe themselves as standardized average estimated useful life values that are not intended to replace professional judgment, which is a fair caveat and does not change the direction of the finding.
For comparison, the NAHB study puts kitchen cabinets at 50 years, built from a 2006 telephone survey of manufacturers and trade associations, and notes in its own text that life expectancy is "greatly affected by the quality of maintenance" and is "based on first-owner use". Both numbers are true of different things. The full comparison is in the cabinet box materials guide.
Layout, clearances and the galley problem
A pass-through kitchen needs 40 inches of clear width between opposing runs and a U-shape needs 60, and a surprising number of Newport Beach kitchens from the 1950s and 1960s do not have it. Those figures come from the 2010 ADA Standards sections 804.2.1 and 804.2.2. They are not a mandate for a private single-family kitchen, and this page does not pretend they are, but they are the only published numbers available and they correspond closely to what two people actually need to pass each other with a tray.
The measurement rule matters as much as the number. The standard's own advisory says clearances are "measured from the furthest projecting face of all opposing base cabinets, counter tops, appliances, or walls, excluding hardware". In other words, measure from the counter edge, not from the cabinet face, and measure at the narrowest point, which is usually wherever the range or the dishwasher sits.
A pass-through kitchen under the standard also has to have two entries. That is a useful design check in its own right: a galley with a single entrance is a dead end with an oven in it, and in a house where somebody cooks while somebody else is passing through, the practical difference between 38 and 42 inches is enormous.
Where the storage should sit
The published unobstructed reach range is 15 to 48 inches above the floor. Below 15, storage is awkward for everybody and genuinely hard for some. Above 48, it is step-stool territory. That range is roughly one base cabinet plus the first shelf of a wall cabinet, which is not very much volume, and it is the reason deep drawers earn their cost: a drawer brings its contents out into the range instead of asking you to reach into it.
Two more figures sharpen it. Reaching over a counter deeper than 20 inches drops the usable high reach from 48 to 44 inches, which is the real height of the first wall shelf over a standard 25-inch counter. And at least 50 percent of shelf space in a storage facility is expected to fall within those ranges, which is a useful target for a kitchen even where it is not a requirement.
What a Newport Beach kitchen specifically asks for
The single largest decade of housing in this city is the 1970s, and that one fact changes how a kitchen replacement is quoted, sequenced and carried out.
SCAG's pre-certified housing data puts 22.3 percent of Newport Beach housing units in the 1970 to 1979 band, the largest of any decade, with 19.0 percent in the 1960s and 11.7 percent in the 1950s. Cumulatively, 61.0 percent of the city's homes were built in 1979 or earlier and 38.7 percent before 1970. A kitchen in that stock is almost always a replacement inside an existing envelope, with plaster or early drywall, a floor that is not flat, corners that are not square, and plumbing centred where it suited the original plumber.
Three consequences follow. First, the scribe allowance is real work rather than a formality: half an inch of variation across a ten-foot run is ordinary in a 1960s house and the finished ends have to be built to absorb it. Second, the waste and supply positions constrain the layout more than people expect, and moving them turns a finish-work job into a permitted one. Third, the 1970s band straddles the 1978 federal lead-paint cutoff, and the data does not split it, so the honest statement is that between 38.7 and 61.0 percent of this city's housing is pre-1978 and a painted kitchen in that stock needs testing before it is sanded or torn out.
Hinges, slides and the 25,000-cycle question
The hardware is what the published cycle test is really measuring, and it is usually the first thing in a kitchen to fail. KCMA A161.1-2022 section 6.2 cycles a door 25,000 times at 20 cycles per minute, and afterwards requires that the door still functions, the door-holding or closure device is still adequate to hold it closed, the sag at the measured point is no more than 0.065 inch, the hinges show no visible damage or loss of function, and the hardware attachment has not become loose at either the cabinet-to-hinge or the hinge-to-door connection.
Section 7.1 does the same for a drawer: loaded at 15 pounds per square foot, cycled 25,000 times at 20 cycles a minute, each cycle opening the drawer two-thirds of its extension length. Afterwards it must remain operable while still loaded, nothing in the assembly may have failed, and the drawer bottom must not have deflected into the slide path.
There is also a static test that people rarely hear about. Section 6.1 hangs 65 pounds on the door, 32.5 pounds on each side, at a 10-inch offset, through ten cycles from 90 degrees open, then leaves it weighted for ten minutes. The door shape must be unchanged afterwards. That is the child-hanging-off-the-door test, and it is the one that separates a properly built frame-and-panel door from a stapled one.
On this coast there is a second axis. Section 9.6, written for metal cabinets, scratches a finished panel to bare metal and holds it at 100 percent relative humidity and 37 to 39 degrees Celsius for 288 hours, allowing no blisters and no more than 0.0625 inch of rust creep from the scratch. It is the clearest published corrosion benchmark available, and in a city that is 55.04 percent water it is a fair question to put to a hardware specification. More in the cabinet hardware page.
Finishing a kitchen in this air district
A painted kitchen gets a tighter coating budget than a stained one in Newport Beach, and it is written into the air district's rule rather than being a matter of shop preference. Newport Beach appears in the Orange County column of the South Coast Air Quality Management District's own jurisdiction list, which puts kitchen cabinetry finished here under Rule 1136 in the shop and Rule 1113 on site.
Rule 1136's Table 1 gives every wood-coating category the same 275 grams per litre of coating limit, which is the number most often quoted, but splits them sharply on pounds of VOC per pound of solids: a clear primer gets 0.36 and a pigmented primer 0.21; a clear topcoat gets 0.35 and a pigmented topcoat 0.25. That is a 30 to 40 percent tighter solids budget on exactly the white and painted finishes this market asks for most, and it translates into more coats, longer flash times and a longer finishing programme.
A kitchen quote that prices a painted finish identically to a stained one has either not been costed properly or is not being finished in this district. The rule-by-rule version is in the VOC rules guide.
Choosing kitchen door fronts without regretting it
The overlay decision costs more and constrains more than the door profile does, and most people spend their attention on the profile. Full overlay leaves a narrow even reveal and almost no visible frame; partial overlay leaves a band of face frame showing; inset sits the door flush inside the frame with a deliberate reveal all round. The first two forgive seasonal movement because the door overlaps the opening. Inset does not, because the reveal is the entire tolerance.
| Species | Tangential coefficient | Movement over a 2.3-point swing | Comfortable on inset? |
|---|---|---|---|
| Sugar maple | 0.00353 | 0.162 in. | Only with a generous, carefully tuned reveal |
| Northern red oak | 0.00304 | 0.140 in. | Workable with care |
| Black walnut | 0.00274 | 0.126 in. | Workable |
| Black cherry | 0.00248 | 0.114 in. | Comfortable |
| Red alder | 0.00256 | 0.118 in. | Comfortable, and a common paint-grade and stain-grade choice here |
| Yellow poplar, paint grade | 0.00289 | 0.133 in. | Workable; usually painted, which slows moisture exchange |
| Sugar pine | 0.00194 | 0.089 in. | The calmest of the common choices |
Coefficients from USDA Forest Products Laboratory Wood Handbook FPL-GTR-282, Table 13-5, per 1 percent change in moisture content at 10 percent MC. The 2.3-point swing is the annual range of the Los Angeles outdoor equilibrium moisture content row in Table 13-1, 9.4 to 11.7 percent, which is the nearest listed station to Newport Beach. A nominal sixteenth-inch reveal is 0.0625 in.
Read that table with the seasonal-vacancy figure beside it. A kitchen in a house that is conditioned year-round sees a narrower swing than the outdoor band suggests. A kitchen in one of the 48.3 percent of Newport Beach vacant units that are seasonal does not. If a client wants inset doors in a house that is shut up from October to May, the species choice and the reveal both have to account for it, and the honest conversation happens before the order rather than after the first summer.
On profile, the short version is that a slab door is the cheapest to make and the easiest to clean, a five-piece shaker door is the most forgiving because the panel floats within the frame, a raised panel costs more to machine and collects more at the edges, and a mullion or glazed door needs either tidy contents or interior lighting to justify itself. The full comparison, including what each costs to build and how each behaves with movement, is in the door styles and overlays guide.
Appliances, and the dimension that is never what it says
Specify every appliance by model number before a single cabinet is cut, because nominal sizes and actual sizes are different numbers. A "30-inch" range can be 29 and seven-eighths or 30 and a quarter depending on the manufacturer, a dishwasher's stated 24 inches does not include the door hinge travel, and a built-in oven's cut-out requirement is a specification in its own manual rather than a derivable number. A kitchen built to nominal sizes needs filler strips added on site, and those fillers are visible.
- Model numbers for the range or cooktop, the oven, the dishwasher, the refrigerator and any integrated microwave or warming drawer, collected before the drawing is finalised
- The manufacturer's stated cut-out dimensions rather than the product dimensions, which are different figures for every built-in appliance
- Door swing and handle projection for the refrigerator, because a counter-depth fridge beside a wall needs clearance to open past ninety degrees
- Dishwasher door clearance against the adjacent base cabinet, which is where a kitchen with a corner dishwasher most often fails
- The gas or electrical requirement for each, because a changed appliance class is a permitted job in this city rather than a cabinetry one
- Ventilation: hood width against cooktop width, and the duct route, which usually has to be designed through a cabinet rather than around one
The published accessibility guidance is useful here too, even outside its scope. Section 804.6.3 of the 2010 ADA Standards notes that a dishwasher door in the open position must not obstruct the clear floor space for the dishwasher or the sink. That is good design advice in any kitchen: an open dishwasher that blocks the sink is the single most common layout annoyance in a small Newport Beach kitchen, and it is free to avoid at the drawing stage.
One more clause worth knowing about, from section 804.3.1, is the condition under which cabinetry is allowed beneath an accessible work surface: the cabinetry must be removable without removing or replacing the work surface, the finish floor must extend under it, and the walls behind and around it must be finished. Build a run that way and a base cabinet can be taken out later to create a seated work position without touching the countertop. That is genuine future-proofing, and it costs almost nothing when it is designed in.
What actually goes wrong with Newport Beach kitchens
Five failures account for most of the kitchens that get replaced in this city, and four of the five are specification decisions rather than accidents.
1. The sink base takes water
Covered above, and first on the list because it is first in frequency. A particleboard carcass under a sink in a house that is empty for part of the year, where a drip goes unnoticed for weeks, is the commonest single cause of a whole-kitchen replacement here.
2. Shelves sag because the span was never calculated
The standard's limit is 0.0625 inch per lineal foot of span under a 15 pounds per square foot load. Nobody specifies a shelf to fail that, but plenty of kitchens are built with 42-inch openings and half-inch shelves because the opening width was chosen for the elevation rather than for the load. The fix at the drawing stage is a thicker shelf, a front edge stiffener or a centre support. The fix afterwards is a replacement shelf in every opening.
3. Hinge screws strip out of a thin carcass side
A concealed hinge plate puts its load into a small area of the carcass side. In a thin or low-density side, repeated cycling works the screws loose, and once a screw hole is enlarged it will not hold again without a repair. This is the failure the standard's requirement that "hardware attachment should not become loose" after 25,000 cycles is written to catch.
4. The finish fails at the sink and the range
The two hottest and wettest zones in the room are where a finish system shows whether it was built for a kitchen. The published chemical-resistance panel, with coffee at 46 degrees Celsius, vinegar, olive oil and 100-proof alcohol read at 24 hours and mustard read at one hour, is a direct proxy for the cabinet face beside a range. So is the hot-and-cold check test, five cycles between 120 and minus 5 degrees Fahrenheit, which is a harsher version of what the door beside an oven experiences.
5. The layout was never right
The one failure that is not a materials problem. A kitchen with less than 40 inches between opposing runs, or with the dishwasher door blocking the sink, or with half the storage above 48 inches, is a kitchen people stop enjoying long before anything breaks. No amount of refacing fixes it, which is why the layout question gets asked on the survey before the material question.
Waste, recycling and the toe kick nobody specifies
Two unglamorous items decide more about how a kitchen feels day to day than any door profile: where the bins live, and whether the plinth is built to a figure.
On the bins, the only wrong answer is a free-standing bin beside the cooker. A pull-out waste and recycling unit takes the bin off the floor, stops the cabinet door becoming a swing hazard and removes the one thing in a kitchen that is always in the way. The constraints are cabinet width and whether that cabinet currently carries plumbing, which is why the position is decided at the survey rather than at the end.
On the plinth, the published standard gives a number most quotes never mention: where there is a toe kick, there shall be a toe space at least 2 inches deep and 3 inches high. That is a minimum rather than a target, and in a sandy coastal house a deeper recess is worth having because it can be swept out rather than collecting grit behind a flush base. The same logic applies more strongly in a mudroom, which is covered on the mudroom lockers page.
Ventilation, the hood, and the cabinet it sits in
The extraction is the one element in a kitchen that is both a cabinet problem and a permitted mechanical problem, and it has to be settled before the run above the cooker is designed.
Newport Beach adopted the 2025 California Mechanical Code as Municipal Code chapter 15.07, under Ordinance No. 2025-23, adopted 4 October 2025 and effective 1 January 2026. That makes ducting, routing and termination a code matter rather than a joinery preference, and it means the hood decision sits with the permitted work rather than with the cabinets.
The cabinet consequences are specific and they are easier to resolve on a drawing than on site.
- Where the duct leaves the hood and where it terminates, because that route decides whether the cabinet above the cooker is usable storage or a duct enclosure
- Whether the run above the hood is a shallow cabinet, a decorative chimney surround or nothing at all, which is an appearance decision with a cost attached
- The clearance the appliance manufacturer specifies between the cooking surface and any combustible cabinetry, which varies by appliance and is not a cabinet-maker's choice
- Whether the two cabinets flanking the hood need to be reduced in depth to clear a wide canopy, which changes their internal width as well
- Where the electrical supply for the hood comes from, since adding an outlet is permitted, inspected work in this city
- Whether any make-up air provision is required for the appliance, which is a mechanical question to confirm with the Building Division rather than to assume
One honest note: this page does not state a clearance figure between a cooking surface and the cabinetry above it, because that figure comes from the appliance manufacturer's own instructions and from the adopted code rather than from any cabinet standard. The correct answer is to have the appliance selected before the run above it is drawn, which is the same discipline the appliance section above argues for. The permit side is on the permits and code guide.
The published cabinet standard does bear on one part of this. It requires that cabinets containing water heaters or other equipment need access panels, which is the same principle applied to anything enclosed in joinery: if it has to be reached, the cabinet has to let somebody reach it. A duct boxed permanently into a cabinet with no access is a repair bill waiting to happen.
The corner, which is the most wasted volume in a kitchen
A blind corner is usually the single largest piece of dead storage in a kitchen, and making it live is the best return on money in the whole cabinet specification.
The arithmetic makes the point. A standard 36-inch blind corner base cabinet encloses roughly nine cubic feet of volume, and without a mechanism perhaps a third of it is genuinely reachable. In a 25-linear-foot kitchen that corner is a meaningful share of the total base storage, and it is the part people stop using within a year of moving in.
The constraint is the opening rather than the cabinet. A mechanism has to pass through the cabinet front, so the measurement that matters is the clear opening, not the nominal width. That is one of the practical advantages of frameless construction, where the opening is the full internal width rather than the width minus two face-frame stiles: on a 24-inch base cabinet a pair of one-and-a-half-inch stiles costs about three inches of opening, which is roughly a 13 percent loss. The construction comparison is on the frameless cabinets page.
| Strategy | What you get | What it costs |
|---|---|---|
| Blind corner with a fixed shelf | The cheapest cabinet in the kitchen and the least usable storage in it | Roughly two-thirds of the corner volume, permanently |
| Blind corner with a pull-out mechanism | Most of the volume becomes reachable without crawling into the cabinet | The mechanism, and a clear opening wide enough to pass it through |
| Corner carousel or rotating shelves | Reachable storage with a simpler mechanism and fewer moving parts to fail | Some volume lost to the circular footprint inside a square box |
| Diagonal corner cabinet with a single door | A large single opening and a shelf you can see all of | Worktop area at the corner, and a door that swings into the walkway |
| Corner sink | Uses the corner for something that does not need depth | A compromised sink position and an awkward plumbing run; rarely the right answer |
| No corner cabinet: a drawer bank up to the corner and a filler | Every cabinet fully usable, with the corner given up deliberately | The corner volume, but gained back in drawer access along the run |
Volumes and losses are design estimates for planning, not published figures. Every job measures the actual clear opening before a mechanism is specified.
The last row is the one most often dismissed and it is frequently correct. Giving the corner up deliberately, so that every cabinet in the run is a fully accessible drawer bank, often produces more usable storage than a corner mechanism and a line of door-and-shelf cabinets beside it. Whether it is right depends on the run length, which is a survey judgement rather than a rule.
Where the storage actually goes, measured against published reach
A kitchen can have plenty of storage in the wrong places, and the published reach ranges are the only numeric way to check whether yours does.
The 2010 ADA Standards are not a requirement for a private home, and this page says so plainly. They are used here as the only published, numeric reach-and-clearance reference worth designing a long-term kitchen against, which matters in a city whose median age is 47.4 and where 24.1 percent of residents are 65 or older.
| Reference | Published figure | How to use it in a kitchen |
|---|---|---|
| Unobstructed forward reach | 48 inches maximum, 15 inches minimum above the finished floor | Anything handled daily belongs in this band. A second shelf above 48 inches is storage for things you use twice a year. |
| Obstructed high forward reach | 48 inches maximum where reach depth is up to 20 inches; 44 inches maximum where depth exceeds 20 inches, with depth capped at 25 inches | Reaching over a 24-inch worktop is the obstructed case, so the practical ceiling above a counter is 44 inches, not 48 |
| Obstructed high side reach | Obstruction height 34 inches maximum and depth 24 inches maximum; 48 inches for a 10-inch depth, 46 inches where depth exceeds 10 up to 24 inches | This is the figure that governs a wall cabinet above a worktop approached from the side |
| Shelf space within reach | At least 50 percent of shelf space in storage facilities should comply with the reach provisions | A useful audit: measure your planned shelf area and check how much of it sits inside the bands above |
| Kitchen work surface height | 34 inches maximum, with an exception for a counter adjustable between 29 and 36 inches | Standard worktop height is 36 inches, so a dedicated lower work surface is a deliberate addition rather than a default |
| Operable parts force | 5 pounds maximum, operable with one hand and without tight grasping, pinching or twisting of the wrist | A pull that needs a pinch grip fails this. It is the clearest argument for bar and D pulls over small knobs. |
| Cabinetry under an accessible work surface | Permitted provided the cabinetry can be removed without removing or replacing the work surface, the finish floor extends under it, and the walls behind and surrounding it are finished | This is the clause that makes a future-proofed kitchen buildable now: a removable base unit under one run |
| Children's forward or side reach | Ages 3 to 4, high 36 inches and low 20; ages 5 to 8, high 40 and low 18; ages 9 to 12, high 44 and low 16 | Useful for deciding where a child's cup or snack drawer goes so it does not need an adult |
Figures from the 2010 ADA Standards for Accessible Design and the associated published guidance, used here as a design reference and never presented as a requirement for a private home.
Three practical conclusions come out of that table and they apply to almost every Newport Beach kitchen. First, drawers rather than doors in base cabinets, because a drawer brings the back of the cabinet to the front of the room and removes the hardest reach in the kitchen. Second, a tall bank rather than a second row of wall cabinets, because floor-to-ceiling storage reached from the front beats high storage reached over a worktop. Third, the removable-base clause is worth designing in now, because it costs almost nothing at the design stage and is expensive to retrofit.
The hardware that makes the first of those possible, including on cabinets you already own, is on the soft-close and pull-out upgrades page.
The install sequence that keeps a kitchen straight
Hang the wall cabinets before the base units, and take the datum off the highest point of the floor. Those two decisions do more for the finished result than any amount of care later, because everything else references them.
- Find the highest point of the floor across the whole run and set the base datum there, so every other cabinet is shimmed up rather than cut down
- Mark a level line for the wall cabinets and hang them first, while there is nothing underneath to work over
- Shim rather than force. A cabinet forced into an out-of-plumb corner will open its own joints and fail the base front joint test the hard way
- Screw back into framing through the hanging rail. The wall-cabinet load test explicitly includes the mounting system in the pass condition
- Join cabinets to each other through the stiles before fixing the assembly to the wall, so the fronts align with each other rather than with the wall
- Scribe the finished ends and fillers to the real wall line, planing the sacrificial edge rather than caulking the gap
- Leave every door and drawer adjustment to the end, then do it in one pass down the run
- Template countertops only after the boxes are level and fixed, never before
The full version, including how this differs on an island or peninsula property where access constrains the delivery, is on the cabinet installation page.
What the house needs to be ready for, before install week
The kitchen has to be empty, the services have to be where the drawing says they are, and on a pre-1978 house the room has to be set up for lead-safe work. None of that is onerous, but all of it is better handled a week early than on the morning.
Emptying is more than the cupboards. On a job covered by the federal renovation rule, the requirement is to remove all objects from the work area, including furniture, rugs and window coverings, or cover them with plastic sheeting or other impermeable material with all seams and edges taped or sealed; to close and cover all duct openings in the work area with taped-down sheeting; to close windows and doors and cover the doors, with the entrance door covered in a way that still lets workers pass through; and to cover the floor, including installed carpet, with taped-down sheeting six feet beyond the perimeter of the surfaces being worked on, or far enough to contain the dust, whichever is greater. In a typical Newport Beach kitchen that is the whole room and part of the next one.
Services are the other half. If the drawing moves a waste, a supply or a circuit, that work happens before the cabinets arrive, under its own permit, and it gets inspected before it is covered. The City of Newport Beach notes that inspectors respond to requests from the contractor and will not visit without an appointment, usually with a one or two day notice, so that inspection sits on the critical path and cannot be squeezed.
Two smaller things save a surprising amount of friction. Confirm the appliance delivery date lands after the cabinets are in and before the countertop template, not before either. And decide where the old cabinets are going: a skip, a reuse charity or a storage run to a garage. On a lead-safe job the old painted components are waste that has to be handled under the containment rules rather than carried out through the house, which is a logistics decision rather than an afterthought.
Next steps
If the kitchen has an island, read the kitchen islands page as well, because an island is specified differently from a wall run and anchored differently. If the existing boxes are sound and only the fronts are dated, refacing is a far cheaper answer. If you are still deciding, the cost guide and the tier comparison settle most of it. Coverage across the city is on the service area page, and you can start a quote from the contact page.